Menyembunyikan dan Menampilkan Icon di Desktop

Posted by Unknown Jumat, 27 Juli 2012 0 komentar
Cara menyembunyikan dan menampilkan icon di desktop, mungkin yang sudah terbiasa dengan komputer tidak lah sulit untuk mengatasi hal ini,,,,,tetapi saya akan coba posting tentang masalah ini,,,,,mungkin di antara kita masih ada yang belum tau,,bagaimana caranya agar icon di desktop tersembunyi,,,ada kalanya kita tidak menyadari sewaktu kita menginstall sebuah program secara otomatis shortcut program tersebut akan muncul di desktop,,,untuk mengatasi masalah ini agan dapat melakukan dengan cara yang mudah dan cepat,,,,,

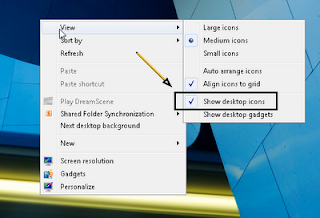
klik kanan pada area desktop kemudian pilih view lalu hilangkan tanda centang nya dengan cara di klik,,,(lihat gambar di bawah ini)
Menyembunyikan dan Menampilkan Icon di Desktop
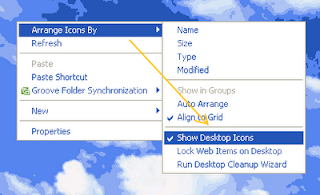
gambar di atas adalah tampilan pada windows7. Untuk yang menggunakan windows xp sebenarnya caranya sama aja tinggal klik kanan di area desktop lalu pilih arrange icon by lalu hilangkan tanda centang nya,,,,seperti gambar di bawah ini:

Menyembunyikan dan Menampilkan Icon di Desktop
Lalu lihat deh hasilnya,,,,,,,icon di desktop sudah hilang semuanya,,,,nah,,untuk mengembalikan nya lagi,,,,ulangi langkah2 di atas tinggal centang lagi show desktop icon nya,,,,,,sekian dulu cara menhilangkan dan menampilkan icon di desktop,,,,semoga bermanfaat,

Baca Selengkapnya ....

Cara Menghilangkan Judul Blog Terbaru

Posted by Unknown Senin, 23 Juli 2012 0 komentar
Bagaimana pun judul blog sangat penting untuk bisa di serch oleh robot google,,,,,tetapi apabila kita  ingin membuat tampilan header yang bagus, tentunya judul blog akan mengganggu tampilan pada header blog,,,,nah disini saya akan coba posting bagaimana caran menghilangkan judul pada header blog,,,,,,sebenarnya bukan menghilangkan sih,,,hanya di sembunyikan agar tidak terlihat di tampilan header blog,,,,berikut tips nya,,,,,,,,,,,,,,,,,

1. login ke akun blog agan
2. pilih desain lalu edit HTML, jangan lupa centang expan template widget
3. cari kode yg di bawah ini ( bisa menggunakan ctrl f) :

#header h1 {
margin:50;
padding:5px 0 0 10px;
font-size: 100%;
font-weight:bold;
line-height: 1.2em;
letter-spacing:.0em;
font-style:italic;
color:#FFFFFF;
}

nah klo sudah ketemu agan tinggal tambahkan kode ini aja : visibility:hidden;
kira2 hasilnya seperti ini :

#header h1 {
margin:50;
padding:5px 0 0 10px;
font-size: 100%;
font-weight:bold;
line-height: 1.2em;
letter-spacing:.0em;
font-style:italic;
color:#FFFFFF;
visibility:hidden;
}
Tetapi bagaimana kalo kode di atas ga ada di edit html, seperti yang ane alami,ane sudah cari2 kode di atas tetapi hasilnya ga ada , untuk yang mengalami masalah seperti ane ,, jangan cemas ane udah nemu maslahnya silahkan agan cari kode seperti di bawah ini:

 .Header h1 {
  font: $(header.font);
  color: $(header.text.color);
  text-shadow: $(header.shadow.offset.left) $(header.shadow.offset.top) $(header.shadow.spread) rgba(0, 0, 0, .2);
}
silahkan agan tambahkan  visibility:hidden;   di tempatkan sebelum tanda } kira2 hasilnya seperti ini:

.Header h1 {
  font: $(header.font);
  color: $(header.text.color);
  text-shadow: $(header.shadow.offset.left) $(header.shadow.offset.top) $(header.shadow.spread) rgba(0, 0, 0, .2);visibility:hidden;
}
4. klik petinjau dan lihat apakah judul pada header sudah tersembunyi,,,klo sudah tersembunyi klik      simpan template.

mungkin cuman itu aja yang bisa ane tulis di artikel ini,,,,,,semoga ada manpaatnya terutama yg ingin mengubah tampilan header pada blog agan,,,,,


Baca Selengkapnya ....

KUMPULAN RAYUAN GOMBAL

Posted by Unknown Jumat, 20 Juli 2012 0 komentar
Untuk agan yang lagi pedekate sama cewe idaman agan, ga ada salah nya mencoba pake trik ini,walaupun jadul tapi ini efektif,,,biasanya cewe itu seneng di sanjung2,,,coba deh di saat agan lagi becanda sekali2 sisipkin rayuan-rayuan,,,di jamin pasti ga mau jauh dari agan,,,,,,,berikut ada rayuan gombal yang bisa cewek nempel terus,,,,,,(hehehe,,,kaya perangko),,,,,langsung aja deh.....

1. Aku pernah jatuh dari tangga 
    Akupun pernah jatuh dari motor
    Dan semua rasanya ga enakkkkkkkk,,,
    Tapi ada satu jatuh yang paling enak,,,,,,,yaitu jatuh cinta sama kamuuuuuuu,,,,,

2. Kata orang pulau bali itu indah
    Kata orang bunga itu cantik
    Tapi menurut ku semua ga indah semua ga cantik,,,,,,
    yang paling cantik, yang paling indah adalah pada saat melihat kamu,,,,,,,

3. Kamu tau ga? apa yang menjadi ketakutan aku selama ini,,,
    Aku takut kehilangan kamu,,,aku ingin selalu memeluk mu,,,,,,

4. Aku bisa memanjat tebing
    Aku bisa berenang di lautan
    Tapi aku ga bisa melupakan kamu,,,,,,,

5. Tau ga sih, kenapa yah malam ini gelap sekali?,,,,
     karna bintang nya pindah ke mata kamu,,,,

6. Tolong ingatkan aku bawa kacamata hitam yah klo mau ketemu,,,,
     Abisnya pesona kamu menyilaukan sihhh,,,,,,,,,

7. Rasanya aku ingin menjadi security aja deh,,,,,
    Agar aku bisa menjaga hati kamu setiap saat,,,,,,,

8. cowo: Sekarang musim hujan yah neng?
    cewe: Iya bang
    cowo: Boleh ga klo aku berteduh di hati kamu,,,,,,,,

9. Aku lelah.....aku sudah tidak ada semangat lagi,,,,,
    Semangat ku sudah pudar dimakan waktu
    Tapi saat melihat kamu semangat ku tumbuh seribu kali lipat,,,,
    Yaitu semangat untuk mengejar cinta kamu..................

10. Aku punya nomor hp kamu,,,,aku punya alamat facebook kamu
      Aku punya alamat email kamu,,,,tapi kapan yah aku punya hati kamu,,,,,,,,,,

11. Aku ingin bertemu sama orang tua kamu,,,,
      Aku hanya ingin  menyampaikan rasa terima kasih aku,,,,,,,
      Karena orang tua kamu telah melahirkan kamu untuk aku,,,

12. Kamu tau ga sih? Saat mata ku tertutup,,,,saat aku terlelap tidur,,,
      Tapi pikiran ku tak pernah tidur,,,,pikiranku selalu terbuka untuk memikirkan mu,,,,
      Kamu adalah orang yang tak pernah hilang dalam pikiran ku,,,,kamu selalu ada di hatiku............

sekian dulu kumpulan rayuan gombal semoga ada manfaatnya,,,,,,,,untuk yang sedang jatuh cinta,,,jangan menyerah terus berjuang karna untuk mendapatkan cinta sejati itu tidaklah mudah,,,,,butuh perjuangan butuh kesabaran dan pengorbanan,,,,,,,,,,,,,,,kita terlahir di dunia ini saling berpasangan, maka carilah pasangan kamu,,,,,,,agar kamu bahagia,,,,,,,,,,,


Baca Selengkapnya ....

cara merubah setingan default mozila menjadi google

Posted by Unknown 0 komentar
ketika saya menginstall mozila,,,,dan setelah selesai saya mencoba membuka websate,,,,berhubung saya sudah terbiasa melakukan pencarian lewat google,,,tetapi setingan saya malah menggunakan pencarian yang lain,,,,,dengan menggunakan jurus andalan saya langsung brousing dan mencari bagaimana merubah stingan mozila saya, agar setiap saya melakukan pencarian langsung di bawa ke google,,,,,dan akhirnya saya menemukan caranya,setelah sekian lama saya kesana kesini berpetualang berkelana demi mendapatkan apa yang saya cari,,,,, dan akhirnya menemukan cara merubah setingan default mozila menjadi google, singkat cerita langsung aja deh,,,,,,

Pertama ketikan about:config di address bar mozilla. Klik saja I’ll be careful, I promise
Kedua ketikan keyword.URL pada kolom Filter
Ketiga klik kanan hasil pada kolom Preference Name, lalu Modify
Keempat, ganti alamat keyword.URL menjadi http://www.google.com/search?ie=UTF-8&oe=UTF-8&sourceid=navclient&gfns=1&q=

Nah setelah itu silakan coba ketik apapun di address bar firefox mozilla dan coba lihat hasilnya … mbah google telah muncul kembali. Jadi mudah-mudahan ini bisa membantu sobat bila anda mengalami permasalahan yang sama dengan yang saya alami.
Semoga artikel tentang  cara merubah setingan default mozila menjadi google dapat bermanfaat untuk yang membutuhkannya. terima kasih dan sampai bertemu kembali

Baca Selengkapnya ....

XNA Tutorial: Make a Game in 60 Minutes #2

Posted by Unknown Jumat, 22 Juni 2012 0 komentar
Hello. This post is the continuation to the previous post on an XNA Tutorial: Make a Game in 60 Minutes.

I have continued from the previous step. Now, there are more problem arising from the tutorial.

Firstly, when the asteroids drifted on top or bottom, the shifting to the other side is smooth. On the other hand, when it happens left to right, you could see the jerking shift. The solution if to change the "if" so that the asteroids will be shifted when they drift more out of the edge and are shifted to more out of the edge as well. I am not sure how to do it smoothly, but I will be doing it roughly. (This amendment will change if you change the viewport resolution or the camera projection setting)

In Asteroid.cs, replace the following:
~~~~~~~~~~~~~~~~~~~~~~~~~~~~~~~~~~~~~~~~~~~~~~
if (position.X > GameConstants.PlayfieldSizeX)
position.X -= 2 * GameConstants.PlayfieldSizeX;
if (position.X < -GameConstants.PlayfieldSizeX)
position.X += 2 * GameConstants.PlayfieldSizeX;
~~~~~~~~~~~~~~~~~~~~~~~~~~~~~~~~~~~~~~~~~~~~~~

with the following:
~~~~~~~~~~~~~~~~~~~~~~~~~~~~~~~~~~~~~~~~~~~~~~
if (position.X > GameConstants.PlayfieldSizeX + 2000)
    position.X -= 2 * GameConstants.PlayfieldSizeX + 4000;
if (position.X < -GameConstants.PlayfieldSizeX - 2000)
position.X += 2 * GameConstants.PlayfieldSizeX + 4000;
~~~~~~~~~~~~~~~~~~~~~~~~~~~~~~~~~~~~~~~~~~~~~~

You might want to ask why for the if condition it is + and - while for the code called for the condition it is both +. The reason is due to the use of -= and +=. Thus, the value after them should be the same for symmetry.

Another change I implement is on the starting point of the asteroids. If you follow the tutorial, you will see that the asteroids appear more on top half then evenly across the screen. This is because the code states that there is only two values, 0 and 1. If it is 0, it will appear on the center of the screen height while if it is 1, top of the screen height. Those are the top and bottom limit. To make the asteroids also appear on the bottom of the screen height, we need to make the random values called to be -1 and 1 instead of 0 and 1 so as the bottom limit is not the center of the height but the bottom of the screen height.

In Game1.cs, replace the following:
~~~~~~~~~~~~~~~~~~~~~~~~~~~~~~~~~~~~~~~~~~~~~~
(This can be found under private void ResetAsteroids())

yStart = (float)random.NextDouble() * GameConstants.PlayfieldSizeY;
~~~~~~~~~~~~~~~~~~~~~~~~~~~~~~~~~~~~~~~~~~~~~~

with the following:
~~~~~~~~~~~~~~~~~~~~~~~~~~~~~~~~~~~~~~~~~~~~~~
yStart = ((float)random.NextDouble() * 2 - 1) * GameConstants.PlayfieldSizeY;
~~~~~~~~~~~~~~~~~~~~~~~~~~~~~~~~~~~~~~~~~~~~~~

It is actually simple math. If I get 0, it will be multiplied by 2 (= 0) then subtracted by 1 (= -1). If I get 1, it will be multiplied by 2 (= 2) then subtracted by 1 (= 1). I found out how to change the 0 and 1 to -1 and 1 from this page.

I just finished step 3, will continue later. Gotta go to Bandung for this weekend :). Hope this post help you. Oh, and by the way, Windows Phone 8 support C++ language. I am not sure about C# support (this tutorial is in C#), hope it is continued! I am also amateur in terms of understanding the different languages and their compatibilities. Anyway, cheers!

Baca Selengkapnya ....

XNA Tutorial: Make a Game in 60 Minutes #1

Posted by Unknown Jumat, 15 Juni 2012 0 komentar
Hello, everybody. I am following up the previous post by doing the 3D tutorial.

There is the tutorial about a simple asteroid game in XNA. Although the tutorial is for XNA Game Studio 3.1, I found no trouble up to now using XNA 4.0. Click here for the link to the tutorial.

I am still halfway through the tutorial (finished Step 2). I paused because I was looking for a way to make it work with keyboard rather than Xbox controller because I don't have one. If you are trying to do the same thing as me, you could refer below.

In Ship.cs, replace the following:
~~~~~~~~~~~~~~~~~~~~~~~~~~~~~~~~~~~~~~~~~~~~~~

public void Update(GamePadState controllerState)
{
// Rotate the model using the left thumbstick, and scale it down.
Rotation -= controllerState.ThumbSticks.Left.X * 0.10f;

// Finally, add this vector to our velocity.
Velocity += RotationMatrix.Forward * 1.0f *
controllerState.Triggers.Right;
}

~~~~~~~~~~~~~~~~~~~~~~~~~~~~~~~~~~~~~~~~~~~~~~

with the following:
~~~~~~~~~~~~~~~~~~~~~~~~~~~~~~~~~~~~~~~~~~~~~~
public void Update(GamePadState controllerState)
{
//Rotate the model using A and D
if (keyboardState.IsKeyDown(Keys.A))
Rotation += 0.10f;
else if (keyboardState.IsKeyDown(Keys.D))
Rotation -= 0.10f;

if (keyboardState.IsKeyDown(Keys.W))
Velocity += RotationMatrix.Forward * VelocityScale;
else if (keyboardState.IsKeyDown(Keys.S))
Velocity -= RotationMatrix.Forward * VelocityScale; 
         }
~~~~~~~~~~~~~~~~~~~~~~~~~~~~~~~~~~~~~~~~~~~~~~


In Game1.cs, replace the following:
~~~~~~~~~~~~~~~~~~~~~~~~~~~~~~~~~~~~~~~~~~~~~~

protected void UpdateInput()
{
// Get the game pad state.
GamePadState currentState = GamePad.GetState(PlayerIndex.One);
if (currentState.IsConnected)
{
ship.Update(currentState);

//Play engine sound only when the engine is on.
if (currentState.Triggers.Right > 0)
{

if (soundEngineInstance.State == SoundState.Stopped)
{
soundEngineInstance.Volume = 0.75f;
soundEngineInstance.IsLooped = true;
soundEngineInstance.Play();
}
else
soundEngineInstance.Resume();
}
else if (currentState.Triggers.Right == 0)
{
if (soundEngineInstance.State == SoundState.Playing)
soundEngineInstance.Pause();
}


// In case you get lost, press A to warp back to the center.
if (currentState.Buttons.A == ButtonState.Pressed)
{
ship.Position = Vector3.Zero;
ship.Velocity = Vector3.Zero;
ship.Rotation = 0.0f;
soundHyperspaceActivation.Play();
}
}
}

~~~~~~~~~~~~~~~~~~~~~~~~~~~~~~~~~~~~~~~~~~~~~~

with the following:
~~~~~~~~~~~~~~~~~~~~~~~~~~~~~~~~~~~~~~~~~~~~~~

protected void UpdateInput()
{
// Get the keyboard state.
KeyboardState currentKeyState = Keyboard.GetState();


ship.Update(currentKeyState);

//Play engine sound only when the engine is on.
if (currentKeyState.IsKeyDown(Keys.W) || currentKeyState.IsKeyDown(Keys.S))
{
if (soundEngineInstance.State == SoundState.Stopped)
{
soundEngineInstance.Volume = 0.75f;
soundEngineInstance.IsLooped = true;
soundEngineInstance.Play();
}
else
soundEngineInstance.Resume();
}
else if (currentKeyState.IsKeyUp(Keys.W) || currentKeyState.IsKeyUp(Keys.S))
{
if (soundEngineInstance.State == SoundState.Playing)
soundEngineInstance.Pause();
}


// In case you get lost, press A to warp back to the center.
if (currentKeyState.IsKeyDown(Keys.Space))
{
ship.Position = Vector3.Zero;
ship.Velocity = Vector3.Zero;
ship.Rotation = 0.0f;
soundHyperspaceActivation.Play();
}
}

~~~~~~~~~~~~~~~~~~~~~~~~~~~~~~~~~~~~~~~~~~~~~~

I did several changes. I change the reset button from Enter (in previous tutorial) to Space so that I can use Enter to shoot, if I decide to do so. Also, I enable moving backward by pressing S which was not implemented in any of the tutorials.

My job here is done :) Sorry about the colours and indentations. It appears black after copy paste from my Visual Studio. If you got questions, you could post them in comment section. I am still thinking about how to make it work both with gamepad and with keyboard, probably changing the update in Ship.cs to Update(Gametime Gametime), but I am unsure about it. For now, I'll stick with the keyboard. :)

Baca Selengkapnya ....

WP7 Game Development Tutorial for Absolute Beginner - Updated

Posted by Unknown Selasa, 05 Juni 2012 0 komentar
I started following this tutorial when I was looking for Windows Phone 7 (WP7) development for absolute beginner. It was for game development. Still trying to finish it. It is a good tutorial, but you may need to tweak some of it a little bit. If you are a real absolute beginner who never touches programming or scripting, you could go here. It's a slow paced tutorial (I never passed the Day 1 mark) but the guy (Bob Tabor) explains really well for you. Anyway, I will discuss the problems I encountered.

Firstly, the position of the player after a few steps changed. It is no longer at the desired position near the center. It will be a little bit up and to the left. Also, the movement is restricted not to the viewport (viewport is the window of the game) but to the left and to the top of the viewport, like this.
____________________
|     _________________|___              Red box is the restricted area of movement
|    |                                  |      |              while black box is the viewport.
|    |                                  |      |
|__|_________________|      |
     |____________________|


To solve it, you need to look for the code which get the value of the player width and height divided by two. I believe it was meant to fix the aforementioned problem, but probably due to version update or something, it CREATES the problem. What is happening is that previously, probably the program calculate the origin of x and y of the player image at the center of the image, while the real thing is at the top left corner of the image. Thus, the problem. By the way, x-axis in the viewport starts from the left while y-axis from the top.

Secondly, you will find that at the tutorial about collision, there is a problem. Sometimes your projectile missed and I can't remember the other problem (I think the starting position of the projectile is wrong). Same problem as above. You need to find out which vector values are wrong. The enemy's rectangle is too high, delete the value of its height divide by 2. If you think the rectangle of the projectile is too to the left, don't, or your projectile will be gone before it touches the enemy's image (when the projectile's image enters the enemy's rectangle but does not touch the enemy's image yet, it is not removed).

Thirdly, after you reach the tutorial about explosion, you will find that the explosions occurs not at the center of the enemy image, but rather at the bottom right corner of the enemy image. I am still figuring out how to fix it, be patient :)

I don't know if the problem is because of the program's version in my computer, but if you encounter the same problems, there you go. :)
And for the record, I am a beginner, although not absolute.


*Update 1:
Seems that the link to the tutorial is gone. I will try too look into it again. If you have any idea where it goes to, could you help me by posting it in the comment? Thanks.

*Update 2:
Okay. I found the link to the tutorial: http://channel9.msdn.com/Blogs/The-XNA-Show/XNA-Game-Development-Intro and http://channel9.msdn.com/Blogs/The-XNA-Show?page=2 . However, it seems that the written tutorial is gone. Can't do much about it. One comment states just go to create.mdsn.com and find the game tutorial there, but I could not find it.

Baca Selengkapnya ....
Trik SEO Terbaru support Online Shop Baju Wanita - Original design by Bamz | Copyright of samsung galaxy mini.